Friday, February 15, 2013

VDay Craft Day


It was the day before VDay and I had been wanting to do Vday crafts with kids all month. I realized that if I did not do it today I would have to wait until next year. I decided to cancel playdate plans at a park and cleaning plans.  I wanted the kids  to make Vday cards for Mr. Wonderful and have fun doing it!

I asked the kids if they wanted to paint and they screamed "Yes"! I set up a table & chairs in the front of the garage. I put clothes on the kids that I did not mind getting painted on.
 I initially let the kids color and paint whatever they wanted to do. The Boy wanted to paint and the Girl wanted to color & paint.


We then took a break to eat a snack. I allowed the Boy to serve his Sister. It was so so cute!

Shortly after that Nana a.k.a my Mom showed up on her lunch break, to deliver the kids Valentine Treats!

The kids were so excited and enjoyed having their first Vday sugar.


When it was time for Nana to return to work our next guests arrived. One of JJ's favorite friends & her lovely Mother.


I then began my organized crafting.


The Boy finished up his free crafting project. He was excited to make his Vday card for his Daddy and also expressed he wanted to make one for his Grandparents too. The Boy made a total of 4 Vday  cards and did very good with using his hand-prints on each one.


The Girl was caught with something in her mouth the entire time & wanted to eat more than she wanted to craft.

After painting their hands it was time to clean them.


I think this was the kids favorite part of Vday Craft day!


Water fun was done and then it was time for lunch!

Lunch eventually came to an end and the Vday crafts were dry, to showoff for the camera!


What a successful VDay Craft Day! I enjoyed it a whole lot and I know the kids did too!!!

Monday, February 11, 2013

Love Week

This year in the name of Valentines I decided to enter a MugSwap, with other bloggers. I had the pleasure of getting Kelly as my assigned partner. I ran over to her blog to check her out. The Lady is quite creative in the DIY department and in photography. I also was able to view some of her own personal pics via her blog. I really liked her engagement pictures.


The next day I was on Costco website and seen that you could personalize your own mugs. A light went off in my head! I went back to Kelly's blog and copied one of her engagement pics, that was perfect for Vday.


I sent Kelly her very own personalized Vday mug that same day. The next day I mailed her a card along with her favorite candy.

My Mug:


1.5 weeks later I received this lovely package!!!


Can I just say that I have never met Kelly but felt her kindness through this bundle of Love!


Friday, February 8, 2013

The Boys New Dresser

The Boy has been using his changing table/dresser since he was born,3.5 years ago. He is potty trained(thank God!) and the dresser drawers have been falling apart. This called for the family to make a trip to Salvation Army. We were in search for a big boy dresser. Mr. Wonderful spotted this real wood piece of beauty. We loved it & the price, so we threw it into the SUV.


The Boy has a sports themed room. I wanted to make sure that this dresser would fit right in with the decor.


I painted the dresser blue and green(using 2 coats on each drawer).


I love how more organized life seems with the
Clothes Labeled Butterfly Dresser I painted for the Girl. I decided to do the same for the Boy.


I used the chalk paint I used for my chalkboards and painted sports and square shapes on each drawer(drawing them on with pencil first). I then labeled & drew away with chalk.


The Boy & I love it!

Tuesday, February 5, 2013

My Chalkboards


Two weeks ago I wrote a whole post on this  chevron curtain . I made it myself & enjoy looking at everyday! Another thing I enjoy in my kitchen is my chalkboard, that I also created with my hands.
This chalkboard helps me stay sane and organized as a working Mommy & Wife. I update it every week with our Dinner Specials for the week. It helps me to know what I need from the stores. I have my stores divided into 3: Costco, Grocery Store, and good ole Target. On our way out to the stores My husband or I take a picture of the store lists. Mr. Wonderful has told me many of times that he loves that i came up with the idea.
How I made the Chalkboard:
I used this chalkboard paint that you can find at any Hardware Store.
I painted over this white board that Mr.Wonderful said he was going to throw out.
I also made another chalkboard from this old glass framed picture my Mom gave to me.
I placed it on the fire mantle, to have fun with WordArt and special occasions.


Thursday, January 31, 2013

Valentines Advent Calendar


This week I made my first Valentines Advent Calendar! I am really looking forwards to Valentines Day. Are plans this year are not your traditional ones, but we will be together(without the kids)! To get the mood started right I decided it would be fun to countdown.
I bought 14 boxes of sweetheart candy (at 24cents each)and empty them into a wine bottle. I then slipped a single activity to do in each box of candy & numbered the boxes.
Activities:


Massages
Dinner on patio after kids are asleep
Candles around the room with music
Over dinner think of new date ideas for 2013
Watch "Valentines Day" all cuddled up
Take a Valentines Self Portrait
Instead of texting send videos to each other for the day
Enjoy a dessert from a fancy Restaurant
Pick a time to pray for each other
Cookies in bed
Play our favorite card/board game at home or coffee shop
Eat heart shaped pancakes for breakfast
Dress each other in your favorite outfit
Happy VDay! Your in charge of activities today!


Mr. Wonderful does not know the specific tasks I have planned. He did say that he is looking forward to seeing what each box has in store for us!
Happy Love Month!!!
Our Delightful Home
I'm a Fan of My 1929 Charmer Blog!
Thursday, January 24, 2013

Insta-Friday


Simplicity captured.
With nothing but my cell phone throughout the week.
That is what Insta-Friday is all about!

This is my Valentines display for this year! I don't think I am going to do more than this....okay maybe I have one more thing under my sleeve!

We got new wheels!!! Honda was my 1st car and now were reunited. I am excited that it has two roles of seats too!
,YAY!!!
One day last week I discovered that my phone's camera got hacked by this Lil guy.
It was an exciting and loud day in our house last Sunday! The 49ers are going to the Super Bowl! My husband and now I am a big fan!!!

The Lil Boy left evidence of playing with my phone but the Lil Girl got caught red handed getting into my watches!
Dear & Sweet friends came in from out of town. We had such a nice time. I baked an Egg White Omelet for the 1st time and it turned out great( I will definitely share on the blog soon). After breakfast we took a nice walk to the park and had a cute time with the kiddos.
My MIL blessed us with a Date Night. We did a Double Date with my Sis and her Man. I love DateNights!!!
This pic got the most likes on Instagram. I wonder why!? The Boy was quite serious about becoming a Trader Joes Customer in Training. The Girl on the other hand almost ran over a couple of people and caused an elderly lady to give me the stank eye.


Tuesday, January 22, 2013

DIY Chevron Curtain


I am totally obsessed with chevron print. So much that I wanted chevron kitchen curtains. The only thing was that I did not want to pay a whole lot. The solution was to make my own!!!
I used what I had:
Leftover brown paint that I used for my dresser
Gold acrylic paint
Yellow kids curtain panel I found at Target($14). The panel was designed to go vertical, but I placed it horizontal. It is a perfect fit for my kitchen window!
Blue Tape
Hanging rod
Curtain clips
How I approached the project at hand:
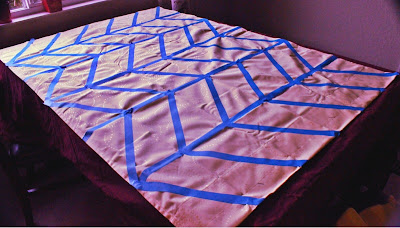
1. I laid the curtain flat and taped down 5 vertical lines (the same distance apart).
2. I then taped horizontal lines in between & on the outside of vertical lines( the creases that were made from the curtain being folded helped a lot). This gave the uniform zig zag a.k.a chevron design.
3. I then moved to my deck to paint inside of every other zigzag. I carefully removed the vertical lines before I painted. I then let it dry overnight on the deck.
4. The next day I moved it back onto the kitchen table. I laid it flat and put a little extra design with gold acrylic paint. I then let that dry for a couple of hours.
5. I had Mr. Wonderful hang curtain rod.I folded the top a little, to fit perfectly! I then used curtain clips to hang .
6. I enjoy looking at these curtains everyday!!!!
Tip Junkie

Our Delightful Home